Critical Enviorment Settings
Asp.net core 6 JWT Authentication will be done in step by step and in detail.
- Visual Studio 2022
- .NET Core 6.0
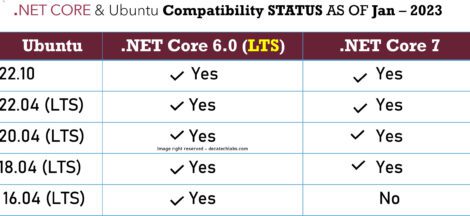
- If using Linux here is the guide on how to install .net core 6 on ubuntu 22.04
- If using Mac here is the easier way how to install .net core on mac
- Api testing tool PostMan or we can use free tool Talent API Tester Chrome plugin
- Nugget Packages used (pay attention to version numbers)
Microsoft.AspNetCore.Authentication.JwtBearer Version 6.0.11
Microsoft.IdentityModel.Tokens Version 6.25.1
System.IdentityModel.Tokens.Jwt Version 6.25.1
These packages mentioned above will help in validating, parsing and generating JWT tokens. Remember the version numbers of packages mentioned are very important if you install without version number or different combination there is possibility you will end up wasting hours.
Let’s ask our self some Prerequisite question before start working on JWT Implementation
Prerequisite Knowledge
- Do you know basics of Json Web Token? If not then Visit jwt.io for learning more about JWT . Chris has also provided good details about JWT info.
- Are you familiar about difference between authentication vs authorization here very brief write up on this?
- Are your aware of filters concept in asp.net core ? Let’s have a brief intro on filters.
Filters can be custom or built-in and helps us to execute common business logic before and after Action methods execute.
We will make use of Authorization built in filters in this project for preventing access to resources a user isn’t authorized for and terminate processing the request.
In request pipeline Authorization filter are first one to get executed as they control access to action methods. Filters will be added directly to the either controllers ,action methods or globally.
Refer to image below you can see multiple types of filters and order. In depth filters discussion is out of scope of this article.

Implementation for Asp.net core 6 jwt authentication :
Let’s move on to actual work that need to be done. Two basic mechanism for securing WEB API
- Using Traditional Cookie based authentication
- Using Token Based Authentication – In simple words our goal is to secure data transmission between two endpoints JWT is a way to achieve.
- Json Web Token Consist of Three parts Each part is separated by a period/dot.
- Header
- The header of a JWT Token is simply a JSON data that contains 2 pieces of information — the type of token, and the signing algorithm used (i.e. HMAC SHA256)– This JSON data will then be Base64Url encoded to form the first part of the JWT.Base64Url encoding refers to converting binary data (i.e. 101101) into ASCII string format.
- Header
- Claim
- The payload contains data about an entity (typically, the user).Again, the JSON data is Base64Url encoded to form the second part of the JWT.
- Signature
- The signature ensures the integrity of the message.
- Json Web Token Consist of Three parts Each part is separated by a period/dot.
The signature requires 4 inputs
- The base64Url encoded Header JSON data (i.e.
ey1NiIsInR5cCI6IkpXVCJdecatechlabs.com9) - The base64Url encoded Payload JSON data (i.e.
eyJasdfasdf22323M5MDIyfQ) - A secret string/key (i.e.
secret) - The signing algorithm specified in the Header JSON data (i.e. HMAC SHA256)
With the 4 inputs, the signature is created with the following algorithm:
HMACSHA256(
  base64UrlEncode(header) + "." +
  base64UrlEncode(payload),
  secret
)
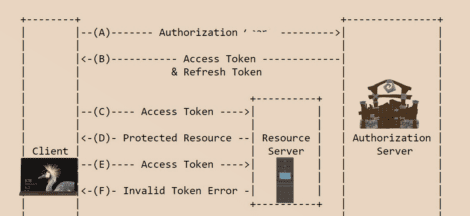
Both jwt authentication methods and Cookie based have pros and cons and that is out of the scope of this article and either of the methods should be adopted based on circumstances. we will follow Token Based Authentication Using jwt authentication. The mechanism is not complex once we get understanding of workflow. So the key is not to jump on code right away but understand flow of request. Let’s do it
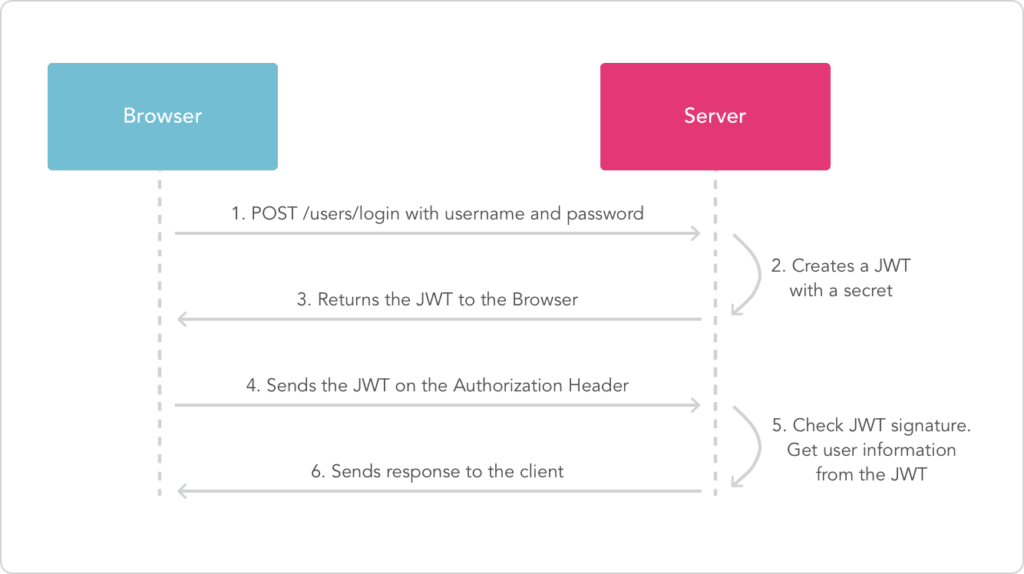
- User Enter username and password on mobile/web application and press login.
- User Credentials are sent to WEB API endpoint.
- We Intercept HTTP Request and check if the header has JWT token(it will not be there for the first request) if not then we verify username and password and if credentials are correct, we create a JWT token using the library and send it is back in the response body.Next time client request protected resource with this token in a header so for the subsequent request we intercept HTTP request and validate token.
Image below shows flow of information between your browser/mobile and server.
Let’s start coding for our asp.net core 6 jwt authentication
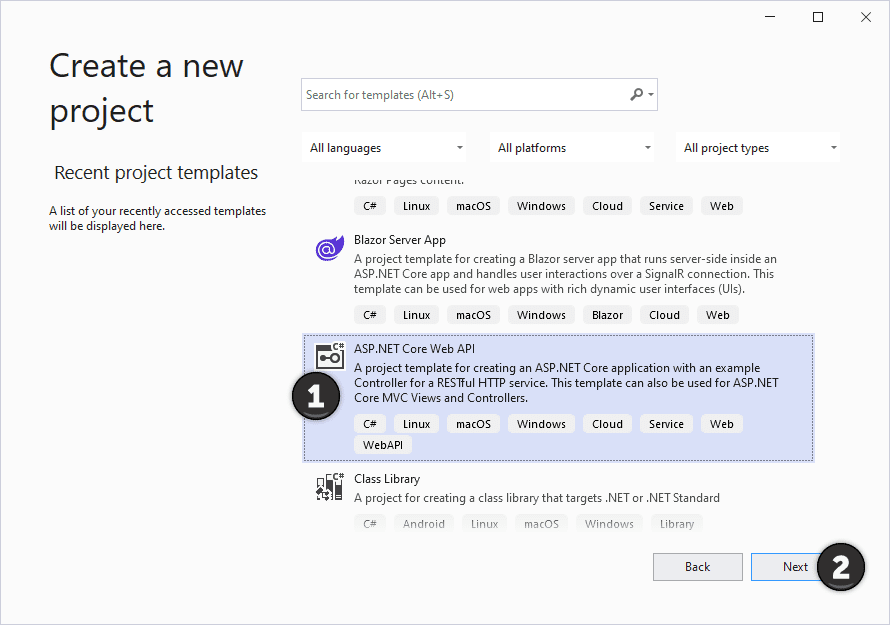
1- Create a New Project and Name your Project and Solution and Select ASP.NET application. In Latest Visual studio there are couple of steps to do it. Select Asp.Netcore Web Api and click on Next
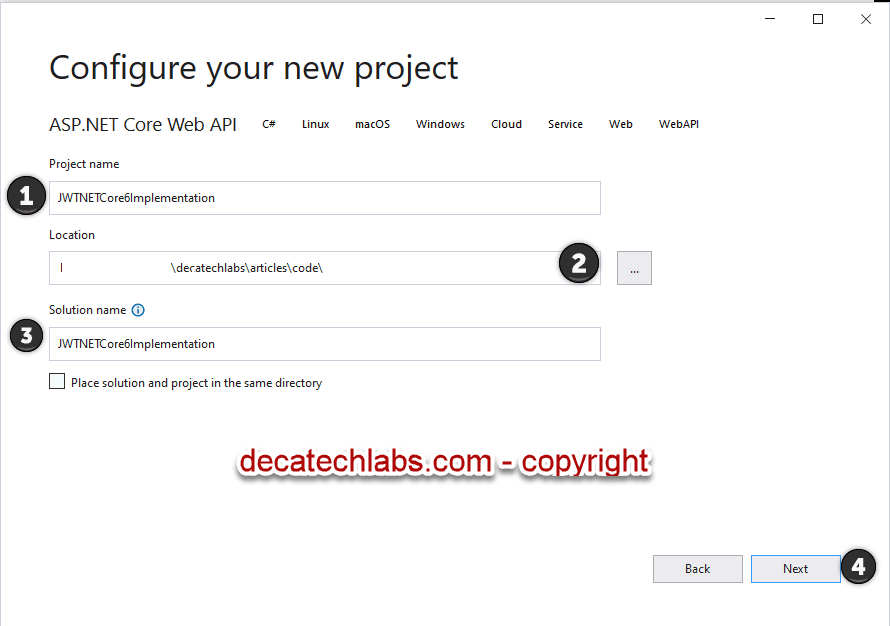
2– Give your project a name / solution name / location/ and Click Next
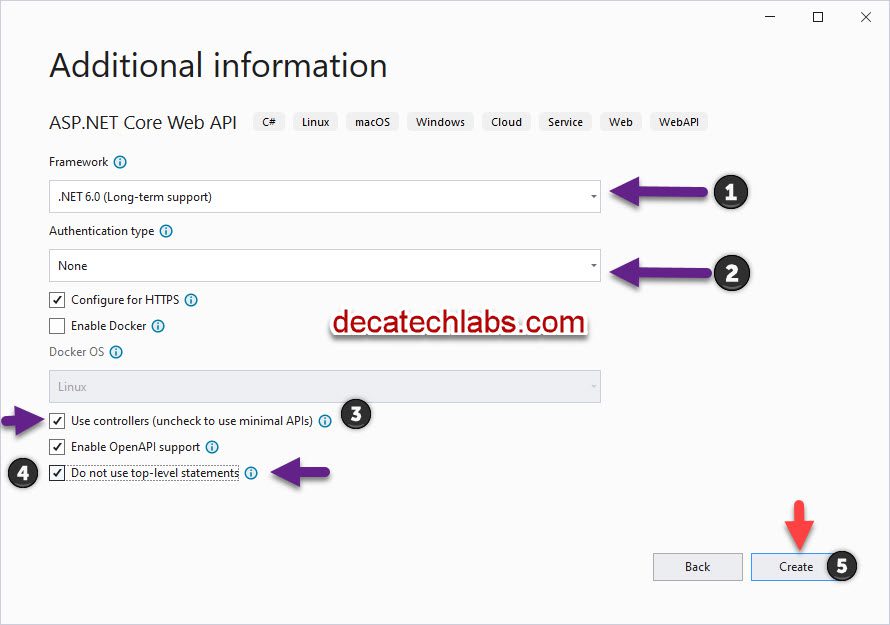
3- Select the 6.0 framework , authentication None and , check use controllers and check do not use top level statement(for simplicity). Click on CREATE
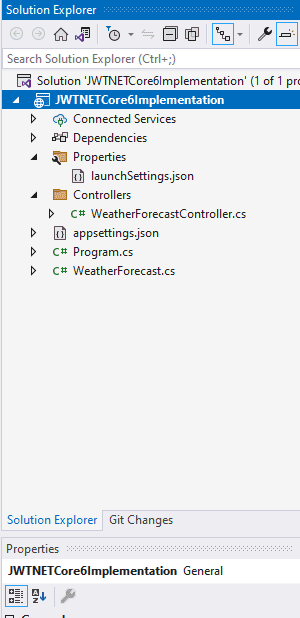
The default project layout is listed below for reference.
4. Build the project and make sure there is no error.

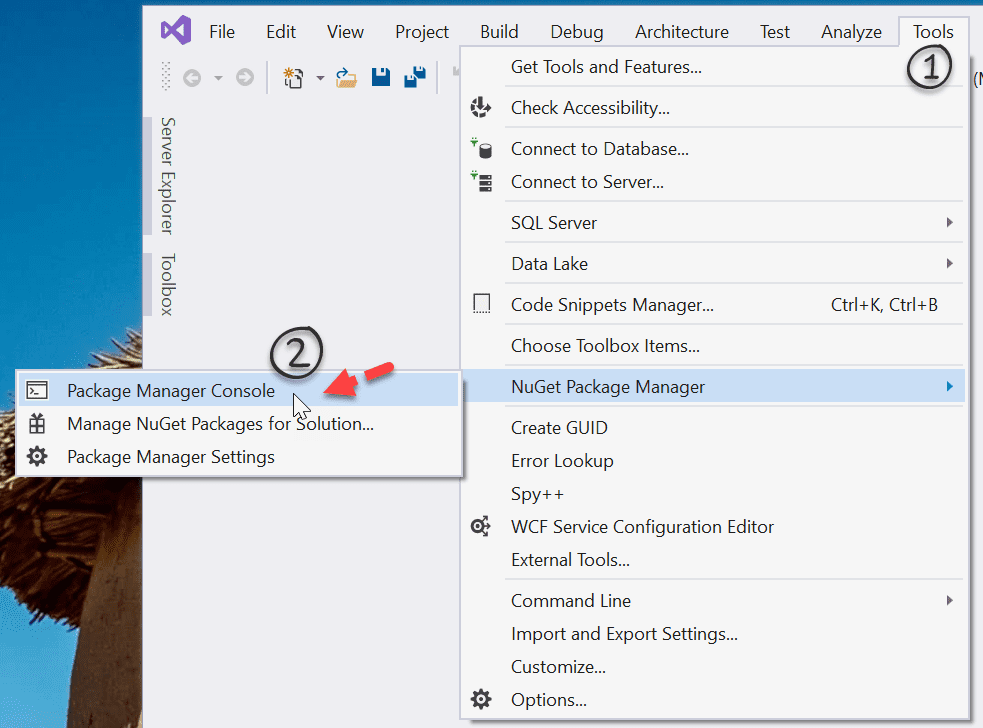
5- Now we have to install Nuget packages – Let’s Access the package manager console using Menu bar
Tools –> Nuget Package Manager —> Package Manager Console
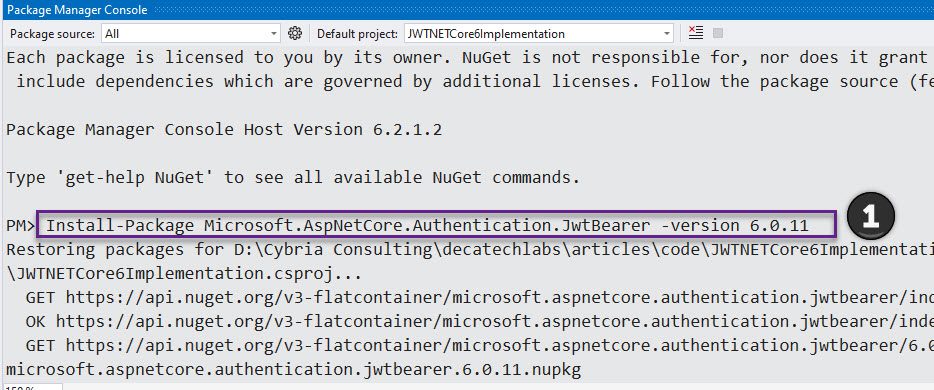
Install this package first using the command below.
Install-Package Microsoft.AspNetCore.Authentication.JwtBearer -version 6.0.11
Type the command and press Enter
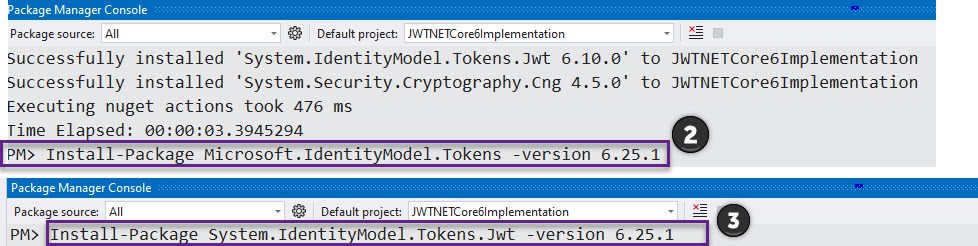
Next Install the next two packages using the following two command.
Install-Package Microsoft.IdentityModel.Tokens -version 6.25.1

Install-Package System.IdentityModel.Tokens.Jwt -version 6.25.1
Build the Project – make sure there is no error
6- We need two model classes (LoginRequest & LoginResponse) or in old school term POCO classes to encapsulate response and request. you can add them where seem appropriate.
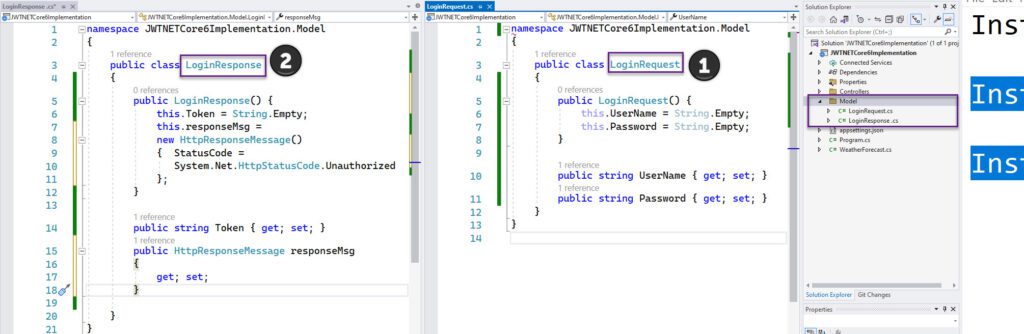
I created folder name Model and put these classes there. Content for both classes is below.
public class LoginRequest
    {
        public LoginRequest() {
            this.UserName = String.Empty;
            this.Password = String.Empty;
        }

        public string UserName { get; set; }
        public string Password { get; set; }
        public int Role { get; set; }
    }
public class LoginResponse
    {
        public LoginResponse() {
            this.Token = String.Empty;
            this.responseMsg =
            new HttpResponseMessage()
            {  StatusCode =
               System.Net.HttpStatusCode.Unauthorized
            };
        }

        public string Token { get; set; }
        public HttpResponseMessage responseMsg
        {
            get; set;
        }

    }
7- jwt token c# .net core
Add a controller name LoginController.cs and use the following content. Don’t just copy paste every thing listed below it does have namespace as your namespace can be different if you still want to copy make sure you copy controller and required imports.
using Microsoft.AspNetCore.Http;
using Microsoft.AspNetCore.Mvc;
using Microsoft.AspNetCore.Http;
using Microsoft.IdentityModel.Tokens;
using System.IdentityModel.Tokens.Jwt;
using System.Net;
using System.Security.Claims;
using System.Security.Cryptography;
using asp.net_core_6_jwt_authentication.Models;
[Route("api/[controller]")]
[ApiController]
public class LoginController : ControllerBase
{
private readonly IConfiguration _configuration;
public LoginController(IConfiguration configuration)
{
_configuration = configuration;
}
[HttpPost("login")]
public ActionResult<object> Authenticate([FromBody] LoginRequest login)
{
var loginResponse = new LoginResponse { };
LoginRequest loginrequest = new()
{
UserName = login.UserName.ToLower(),
Password = login.Password
};
bool isUsernamePasswordValid = false;
if (login != null)
{
// make await call to the Database to check username and password.
// here we only checking if password value is admin
isUsernamePasswordValid = loginrequest.Password == "admin" ? true : false;
}
// if credentials are valid
if (isUsernamePasswordValid)
{
string token = CreateToken(loginrequest.UserName);
loginResponse.Token = token;
loginResponse.responseMsg = new HttpResponseMessage()
{
StatusCode = HttpStatusCode.OK
};
//return the token
return Ok(new { loginResponse });
}
else
{
// if username/password are not valid send unauthorized status code in response
return BadRequest("Username or Password Invalid!");
}
}
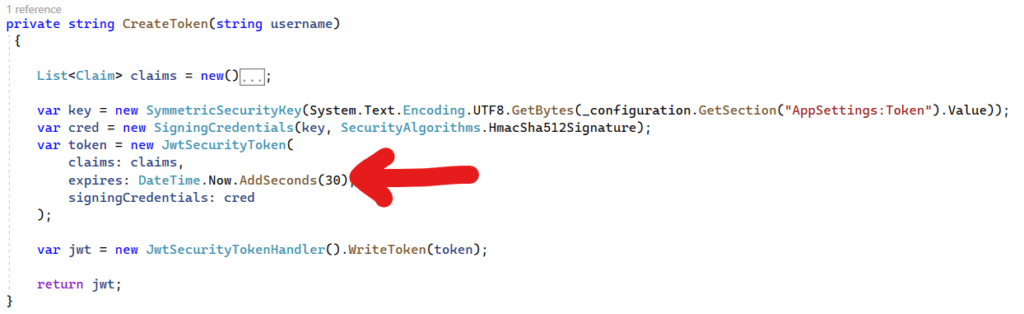
private string CreateToken(string username)
{
List<Claim> claims = new()
{
//list of Claims - we only checking username - more claims can be added.
new Claim("username", Convert.ToString(username)),
};
var key = new SymmetricSecurityKey(System.Text.Encoding.UTF8.GetBytes(_configuration.GetSection("AppSettings:Token").Value));
var cred = new SigningCredentials(key, SecurityAlgorithms.HmacSha512Signature);
var token = new JwtSecurityToken(
claims: claims,
expires: DateTime.Now.AddHours(2),
signingCredentials: cred
);
var jwt = new JwtSecurityTokenHandler().WriteToken(token);
return jwt;
}
}
Some explanation of the Login Controller code
Login action method receive the username and password and after successful authentication(in real word it would a call to the database) it makes a call to the method createToken and return the JWT token. In CreateToken method we read AppSettings:Token
value and create the SymmetricSecurityKey.Also see the expires property set to 2 hours that mean Access Token will expire after 2 hours. And finally notable thing is we are using SecurityAlgorithms HmacSha512Signature.
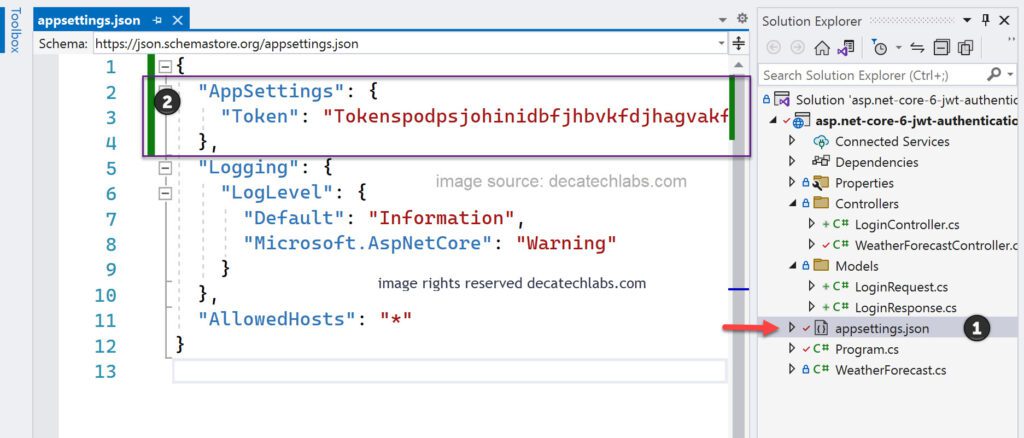
Inside createToken method in LoginController we referred to Token section in appsettings file , Let’s add that section and value in appsettings.json.
{
  "AppSettings": {
    "Token": "Tokenspodpsjohinidbfjhbvkfdjhagvakfd&*¨T&(SFGD&(¨SFD(&VY&(6dfsutf7f6dod8g-f&TG08t¨&*ts&¨*dt&sfg(öd&astdecatechlabs"
  },
  "Logging": {
    "LogLevel": {
      "Default": "Information",
      "Microsoft.AspNetCore": "Warning"
    }
  },
  "AllowedHosts": "*"
}
we storing Token in the appsetting.json for sake of this example only, storing keys in appsettings file could lead to accidentally adding them to your source-code manager (security). You could use user secrets for local development (or disable the key when environment = dev) and environment variables for production.
8- Add JWT Handling Support in the middleware pipeline in file Program.cs
In ASP.NET Core 6.0, the usual Startup.cs class is removed Instead Program.cs class is used to register the dependencies of the application and the middleware. Remember the order in which you add the middleware is important we can not just place a code anywhere.
Open program.cs file add these imports on first line.
using Microsoft.AspNetCore.Authentication.JwtBearer;
using Microsoft.IdentityModel.Tokens;
using System.Text
Add the following code after this line builder.Services.AddSwaggerGen();
Add JWT Authentication Middleware – This code will intercept HTTP request and validate the JWT.
In code below We instructed the middleware pipeline to use JWTBearer authentication scheme and also notice we are using this section AppSettings:Token value to verify the token sent by user that we used while creating the token in login controller createToken method.
builder.Services.AddAuthentication(JwtBearerDefaults.AuthenticationScheme).AddJwtBearer(
                opt => {
                    opt.TokenValidationParameters = new TokenValidationParameters
                    {
                        ValidateIssuerSigningKey = true,
                        IssuerSigningKey = new SymmetricSecurityKey(Encoding.UTF8
                        .GetBytes(builder.Configuration.GetSection("AppSettings:Token").Value)),
                        ValidateIssuer = false,
                        ValidateAudience = false
                    };
                }
              );
Add the following code after this line app.UseHttpsRedirection();
app.Use(async (context, next) =>
            {
                await next();

                if (context.Response.StatusCode == (int)System.Net.HttpStatusCode.Unauthorized)
                {
                    await context.Response.WriteAsync("Token Validation Has Failed. Request Access Denied");
                }
            });

app.UseAuthentication();
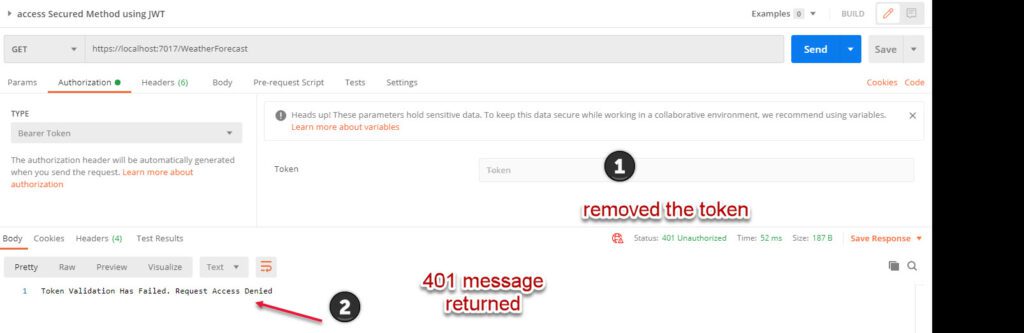
This code is telling pipeline that if token is invalid and authentication failed then return a custom response. This is optional. if you don’t add this code, you will get a 401 unauthorized response. Returning the custom and meaningful response is good. And on last line in code above finally we telling pipeline to Use Authentication.
9- Add Authorize attribute to action method/controller to restrict the access. I added to the following controller.
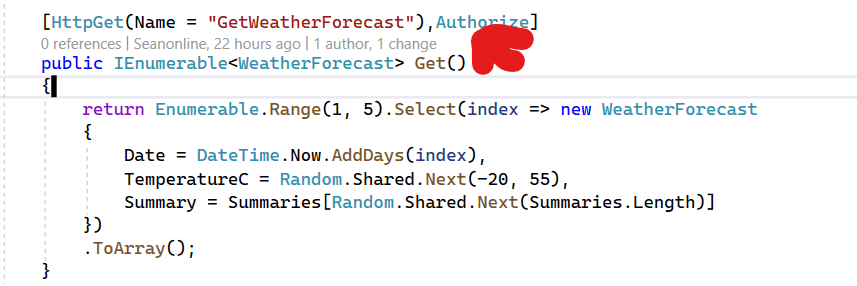
[HttpGet(Name = "GetWeatherForecast"),Authorize]
        public IEnumerable<WeatherForecast> Get()
        {
            return Enumerable.Range(1, 5).Select(index => new WeatherForecast
            {
                Date = DateTime.Now.AddDays(index),
                TemperatureC = Random.Shared.Next(-20, 55),
                Summary = Summaries[Random.Shared.Next(Summaries.Length)]
            })
            .ToArray();
        }
In its most basic form, applying the [Authorize] attribute to a controller, action, or Razor Page, limits access to that component to authenticated users. Now only authenticated users can access the GetWeatherForecast action method.
10- Testing Using Postman by getting the JWT token and then using that to access the action method above you decorated with Authorize attribute.
Run the project using Debug –> Start Without Debugging or Press Ctrl+F5
When you post the user credentials to the login endpoint using Postman, you’ll be able to see the generated token.
(1)Add the url of your application the port number will be different (2) Change call type to post and enter the json payload below in the body tab (3) Click on send.
{ "Username": "testUser1", "Password": "admin" }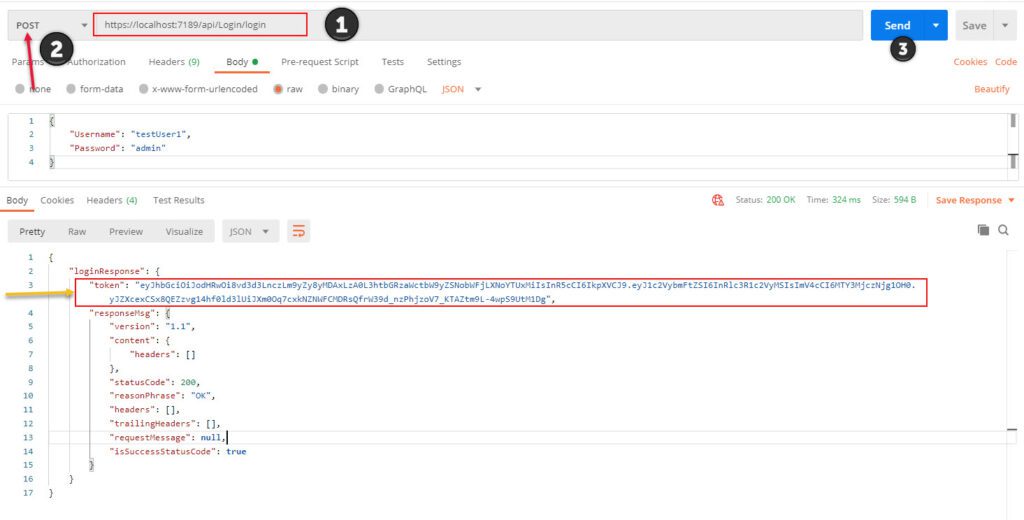
We will use the token above to access the secured endpoint. Remember we put Authorize attribute on top of the action method to secure the it.
Let’s access the secured method above using this Token
- Make a get call to the secure endpoint in my case it was https://localhost:7189/api/WeatherForecast using the token provided as Bearer token.
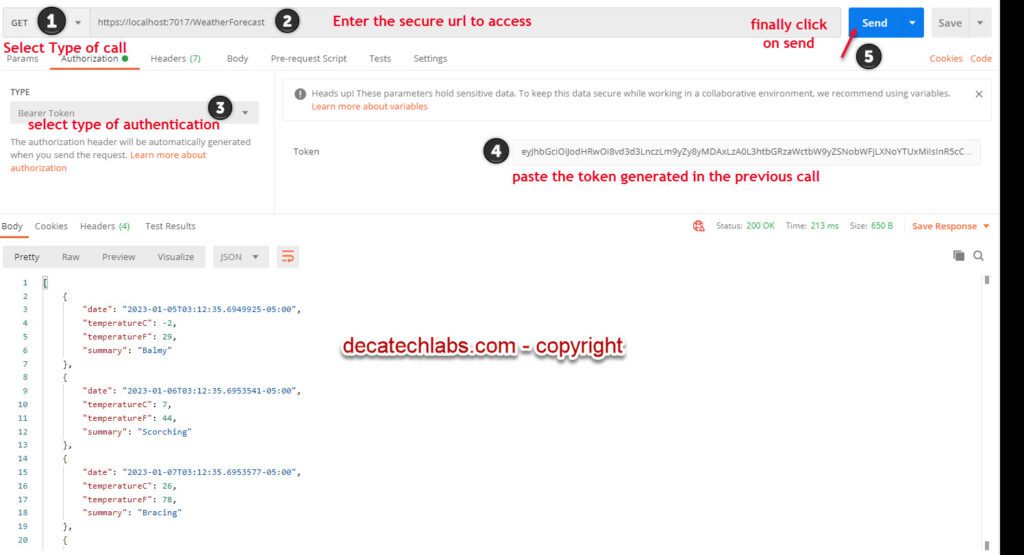
You are able to access the secured method using asp.net core 6 jwt authentication. we accessed our secured resource using JWT. It is valid for about of time we set when we generated it . if we temper with it unauthorized code is returned.
How about we remove the Token or change it by adding/removing anything in that string and click on send to verify if method is secured.
Let’s check what have you learned.
Try this and check what is the outcome ?
When we creating token inside LoginController we specified token to expire in 2 hours and then i set it to 30 seconds. Instead change it to 10 seconds and make first call get the token use that token to access the secure method and then try again using the same code after 10 seconds.
What should happen with the change you made above ? If you paid attention, you will have the answer.
Since the token will expire, the user will have to login again and get the token generated – keeping the short/reasonable expiry time of the token will help in the long run.
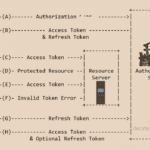
If you want the user to avoid logout once the access token expires . we can use concept of Refresh token.
As mentioned, for security purposes, access tokens may be valid for a short amount of time. Once they expire, client applications can use a refresh token to “refresh” the access token. That is, a refresh token is a credential artifact that lets a client application get new access tokens without having to ask the user to log in again.
Frequent re-authentication can diminish the perceived user experience of your application. Even if you are doing so to protect their data, users may find your service frustrating or difficult to use.
A refresh token can help you balance security with usability. Since refresh tokens are typically longer-lived, you can use them to request new access tokens after the shorter-lived access tokens expire.
Adding Refresh token Support will be done in the part#2 of this article.
Some of the actionable concepts and tips when working with JWT.
- Do use a strong and longer Secret for your JWT signature generation
- Senstive data storage in JWT is big No No as any kid can use base64url online decode utlity to get the content of the payload.
- Use only Httponly cookies to store JWT’s
That’s it your endpoint is now secured ; you can use authorize attribute to decorate action method or controller etc. Here is the repository link you can access the code
asp.net core 6 jwt authentication code:
The MAIN branch contain the code for this write up.
Recommended Next Reading :
 Oauth2 Refresh Token Explained Using .NET Core 6
[…] ASP.NET CORE 6 JWT Authentication […]
[…] This flow is meant to be used for first class web applications(GMAIL client is owned by GOOGLE’s Owned Gmail emailing Service or Spotify mobile app is owned itself by Spotify Swedish organization itself) OR mobile applications. Here is the .NET Core 6 implementation of this grant. […]